Our Heartspun Homeschool

Our Heartspun Homeschool
Showing posts with label canning. Show all posts

Tuesday, October 13, 2015

Our day as Farmers

Last month, my husbands parents came to visit and we decided to treck up North to Miller Farms. At Miller Farms you can enjoy their farm as well as pick your own vegetables. Right up my wanna be homesteader alley!! It was a little bit pricey, but we had fun and it was quite an experience. First we enjoyed playing on all their fun attractions..then we ate lunch..then we hopped on a tractor trailer and were driven to the fields. We went to (I think 5) different fields that were growing different crops. We had plastic bags and could fill them very full at each stop if we wanted to. We left with about 22 bags of potatoes, cabbage, peppers, gourds, pie pumpkins, tomatoes, corn, onions, carrots and probably some other things I am forgetting. We had a fun day and it was a great one time experience. ;)


This was a trampoline like place to play that was made entirely out of old cut up Croc shoes.


Wednesday, August 12, 2015

Canning peaches

I have been trying to can quite a bit of the yummy summer produce lately so that we can enjoy it all year long. I really enjoy canning things, it gives me something to do besides my normal "mommy & teacher" jobs. I decided I would take pictures the last time I canned peaches to show everyone how easy it is. There are a few items you need to have on hand first besides just peaches. You need a water bath canner or a pressure canner. I use my pressure canner and just use it as a water bath canner so I don't have so many pots laying around my house. ( I hate clutter!!) You will need jars (Costco has a great deal on pint jars right now 12 jars for $6.50 which is roughly fifty cents a jar). A jar lifter is good to have to get the jars in and out of the canner and a jar funnel and a magnetic wand. You can usually buy a canning kit at Wal-Mart that has all of these things in one box. A rubber spatula is good as well so you can get all the air bubbles out after you add boiling water to your jar of peaches.You will also need some lemon juice so you can soak your peach slices is a mixture of mostly water with a splash of lemon juice.

My big box of peaches- local Colorado peaches were $.88/lb this weekend. They are so sweet and juicy!

Things you need- (forgot to add in the magnetic wand)

Bring a big pot of water to a boil, add enough peaches where they aren't on top of one another and leave in for about 30 seconds.

Take them out of the water and let them cool in a bowl for a few minutes. They will be pretty hot to try to peel right away.(Just use your hands) Once you start peeling, it will come off very easily. Put the peaches in another bowl without the peel until you have peeled all of the peaches. Then make cuts in the peach the size of slices and gently try to pull the slices off the pit without making a mess of the peaches.

After you get the slices off, you want to put them in some lemon juice water so they wont go brown. Leave them in this mixture at least 15 minutes.

When your ready to put them in your jars, drain off the lemon juice water.

Put them in jars, have some water boiling on the stove while the peaches are in the lemon juice water so that after you put them in jars you can add the boiling water pretty quickly.

Fill the jars 1" from the top with peaches and the boiling water.

Use the rubber spatula and glide it around the whole jar to release any air bubbles that might be in the jar. Put your lids and rings in boiling water for a few minutes before the jars are ready. Use your magnetic wand to get the lids and rings out of the boiling water and use a towel to screw the rings on so you don't burn yourself.

Use your jar lifter to put the jars in your canner. Then make sure it is filled with water about 2" above the top of the jars. Put the lid on and heat on high until boiling. My canning book says to boil for 25 minutes (pints) 30 minutes (quarts) at sea level and go up 2 extra minutes per 1000 ft. above sea level. So I boil my pints for 37 minutes because we are about 6000ft. above sea level. I always set my kitchen timer to do everything exactly the amount of time it needs. Make sure when they are finished you use your jar lifter to take them out of the canner, set them on the counter and listen because over the next hour you will hear that wonderful "pop" sound that lets you know your jars are sealed and you have succeeded in your canning venture!


Here is your finished product! So yummy and no HFCS in it, just water!! I canned about 30lbs of peaches this past weekend so we should be set for this next year. Good luck if you decide to try your hand at canning peaches!


Thursday, September 18, 2014

Cinnamon Applesauce Pouches


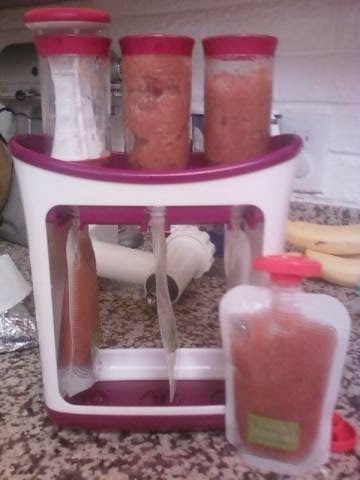
Every year I buy a bushel or more of apples and preserve applesauce to last us the next (hopefully) year, until they go on sale again. This year is no different. A health food store in town (Sprouts) recently had a sale on Gala apples, $.48/pound. So I bought a bushel. The week before, we had visited the Happy Apple Farm and bought some apples there too. So I have a ton to work with! I decided instead of canning the first couple batches, I would put them into squeezy pouches I had bought for making baby food. I froze them to be able to take to their one day a week homeschool enrichment program. They LOVE go-go squeeze applesauce but I just cannot afford to buy them for 4 kids. I am going to show you my applesauce recipe (you can use whatever one you like!), along with how I used the Infantino Pouch Maker. You can buy one on Amazon for about $18, (it includes 10 pouches) you can even go in with a friend and share it since it's not something you would both need at the same time. Once you buy it, all you have to do is buy more pouches, on Amazon the pouches are $12 for 50 pouches. ..which is a good deal! Plus you know the applesauce is good and homemade!!

Applesauce Recipe

8 lbs Apples
1" water in pot
1 Cup Sugar (optional)
Cinnamon (optional)

I DO NOT peel my apples, I just use the Pampered Chef apple slicer & corer. (This is the cinnamon I buy from Sam's, it lasts a lot longer than those little bitty jars from the store)


The kiddos love to help, so I had them peeling the stickers off of all the apples, and Little Brother just wanted to throw the apples all over the kitchen!!


 I put about 1" of water in a big pot then start filling it up with sliced apples. Once its just about to the top I sprinkle the whole top with cinnamon.


Next I put the lid on and put it on the stove. I turn the heat to medium and check it every 15 minutes or so.(If you find your water is boiling over I would turn the heat down to low-medium) I stir the apples around every 30 minutes to make sure the cinnamon gets mixed up good. It usually takes an hour and half to two hours to cook them good. Once they are done I put them through the meat grinder attachment on my Kitchen Aid (I rarely use it to grind meat)  By using this attachment I am able to avoid the apple peeling process. The tough skin gets stuck and won't even go through the grinder, the rest gets ground up and you don't even know its there! Before I put the applesauce through the grinder I add a cup of sugar and stir it around. You don't by any means have to add the sugar, but I do just because we like our applesauce a little sweeter.****If your apples are juicy you do not want to add all the liquid that you end up with when they are ready to go through the grinder, so make sure you notice that your applesauce has a good consistency. I had a pint of juice left over on my last batch***


Once it goes through the grinder it is ready to either be canned, frozen, or eaten right then (we like it warm with some Cool Whip on top!) With this batch I chose to put it all into my Infantino Fresh Squeezed Pouch Maker.


I'm not sure how many pouches I made, maybe 25. This should last a good while for the kids to take to school and I won't have to buy the little cups of applesauce or remember to buy plastic spoons to send with them. The night before you want to put them in their lunches I would recommend putting them in the fridge to thaw, that way they are all ready to go in their lunch bags the next morning.

When I can the applesauce in jars I usually get about 2 quarts and 2 pints per batch. I use a pressure canner and it takes 20 minutes, but you can use a water bath canner as well. They need to boil for about 20 minutes to be processed correctly. Let them sit to cool and you will hear them pop. Once they are cooled label and date them and store them away!! Good Luck!

** I am not in any way being compensated by Amazon or Infantino for this post, this is just something I highly recommend and believe Amazon has the best price for it. **