Our Heartspun Homeschool

Our Heartspun Homeschool
Showing posts with label homemade. Show all posts

Wednesday, August 12, 2015

Canning peaches

I have been trying to can quite a bit of the yummy summer produce lately so that we can enjoy it all year long. I really enjoy canning things, it gives me something to do besides my normal "mommy & teacher" jobs. I decided I would take pictures the last time I canned peaches to show everyone how easy it is. There are a few items you need to have on hand first besides just peaches. You need a water bath canner or a pressure canner. I use my pressure canner and just use it as a water bath canner so I don't have so many pots laying around my house. ( I hate clutter!!) You will need jars (Costco has a great deal on pint jars right now 12 jars for $6.50 which is roughly fifty cents a jar). A jar lifter is good to have to get the jars in and out of the canner and a jar funnel and a magnetic wand. You can usually buy a canning kit at Wal-Mart that has all of these things in one box. A rubber spatula is good as well so you can get all the air bubbles out after you add boiling water to your jar of peaches.You will also need some lemon juice so you can soak your peach slices is a mixture of mostly water with a splash of lemon juice.

My big box of peaches- local Colorado peaches were $.88/lb this weekend. They are so sweet and juicy!

Things you need- (forgot to add in the magnetic wand)

Bring a big pot of water to a boil, add enough peaches where they aren't on top of one another and leave in for about 30 seconds.

Take them out of the water and let them cool in a bowl for a few minutes. They will be pretty hot to try to peel right away.(Just use your hands) Once you start peeling, it will come off very easily. Put the peaches in another bowl without the peel until you have peeled all of the peaches. Then make cuts in the peach the size of slices and gently try to pull the slices off the pit without making a mess of the peaches.

After you get the slices off, you want to put them in some lemon juice water so they wont go brown. Leave them in this mixture at least 15 minutes.

When your ready to put them in your jars, drain off the lemon juice water.

Put them in jars, have some water boiling on the stove while the peaches are in the lemon juice water so that after you put them in jars you can add the boiling water pretty quickly.

Fill the jars 1" from the top with peaches and the boiling water.

Use the rubber spatula and glide it around the whole jar to release any air bubbles that might be in the jar. Put your lids and rings in boiling water for a few minutes before the jars are ready. Use your magnetic wand to get the lids and rings out of the boiling water and use a towel to screw the rings on so you don't burn yourself.

Use your jar lifter to put the jars in your canner. Then make sure it is filled with water about 2" above the top of the jars. Put the lid on and heat on high until boiling. My canning book says to boil for 25 minutes (pints) 30 minutes (quarts) at sea level and go up 2 extra minutes per 1000 ft. above sea level. So I boil my pints for 37 minutes because we are about 6000ft. above sea level. I always set my kitchen timer to do everything exactly the amount of time it needs. Make sure when they are finished you use your jar lifter to take them out of the canner, set them on the counter and listen because over the next hour you will hear that wonderful "pop" sound that lets you know your jars are sealed and you have succeeded in your canning venture!


Here is your finished product! So yummy and no HFCS in it, just water!! I canned about 30lbs of peaches this past weekend so we should be set for this next year. Good luck if you decide to try your hand at canning peaches!


Thursday, September 18, 2014

Cinnamon Applesauce Pouches


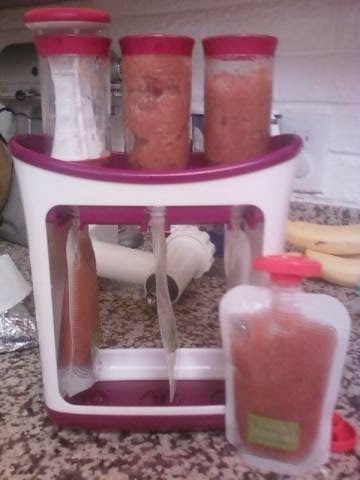
Every year I buy a bushel or more of apples and preserve applesauce to last us the next (hopefully) year, until they go on sale again. This year is no different. A health food store in town (Sprouts) recently had a sale on Gala apples, $.48/pound. So I bought a bushel. The week before, we had visited the Happy Apple Farm and bought some apples there too. So I have a ton to work with! I decided instead of canning the first couple batches, I would put them into squeezy pouches I had bought for making baby food. I froze them to be able to take to their one day a week homeschool enrichment program. They LOVE go-go squeeze applesauce but I just cannot afford to buy them for 4 kids. I am going to show you my applesauce recipe (you can use whatever one you like!), along with how I used the Infantino Pouch Maker. You can buy one on Amazon for about $18, (it includes 10 pouches) you can even go in with a friend and share it since it's not something you would both need at the same time. Once you buy it, all you have to do is buy more pouches, on Amazon the pouches are $12 for 50 pouches. ..which is a good deal! Plus you know the applesauce is good and homemade!!

Applesauce Recipe

8 lbs Apples
1" water in pot
1 Cup Sugar (optional)
Cinnamon (optional)

I DO NOT peel my apples, I just use the Pampered Chef apple slicer & corer. (This is the cinnamon I buy from Sam's, it lasts a lot longer than those little bitty jars from the store)


The kiddos love to help, so I had them peeling the stickers off of all the apples, and Little Brother just wanted to throw the apples all over the kitchen!!


 I put about 1" of water in a big pot then start filling it up with sliced apples. Once its just about to the top I sprinkle the whole top with cinnamon.


Next I put the lid on and put it on the stove. I turn the heat to medium and check it every 15 minutes or so.(If you find your water is boiling over I would turn the heat down to low-medium) I stir the apples around every 30 minutes to make sure the cinnamon gets mixed up good. It usually takes an hour and half to two hours to cook them good. Once they are done I put them through the meat grinder attachment on my Kitchen Aid (I rarely use it to grind meat)  By using this attachment I am able to avoid the apple peeling process. The tough skin gets stuck and won't even go through the grinder, the rest gets ground up and you don't even know its there! Before I put the applesauce through the grinder I add a cup of sugar and stir it around. You don't by any means have to add the sugar, but I do just because we like our applesauce a little sweeter.****If your apples are juicy you do not want to add all the liquid that you end up with when they are ready to go through the grinder, so make sure you notice that your applesauce has a good consistency. I had a pint of juice left over on my last batch***


Once it goes through the grinder it is ready to either be canned, frozen, or eaten right then (we like it warm with some Cool Whip on top!) With this batch I chose to put it all into my Infantino Fresh Squeezed Pouch Maker.


I'm not sure how many pouches I made, maybe 25. This should last a good while for the kids to take to school and I won't have to buy the little cups of applesauce or remember to buy plastic spoons to send with them. The night before you want to put them in their lunches I would recommend putting them in the fridge to thaw, that way they are all ready to go in their lunch bags the next morning.

When I can the applesauce in jars I usually get about 2 quarts and 2 pints per batch. I use a pressure canner and it takes 20 minutes, but you can use a water bath canner as well. They need to boil for about 20 minutes to be processed correctly. Let them sit to cool and you will hear them pop. Once they are cooled label and date them and store them away!! Good Luck!

** I am not in any way being compensated by Amazon or Infantino for this post, this is just something I highly recommend and believe Amazon has the best price for it. **

Monday, July 23, 2012

Easy Homemade Yogurt!

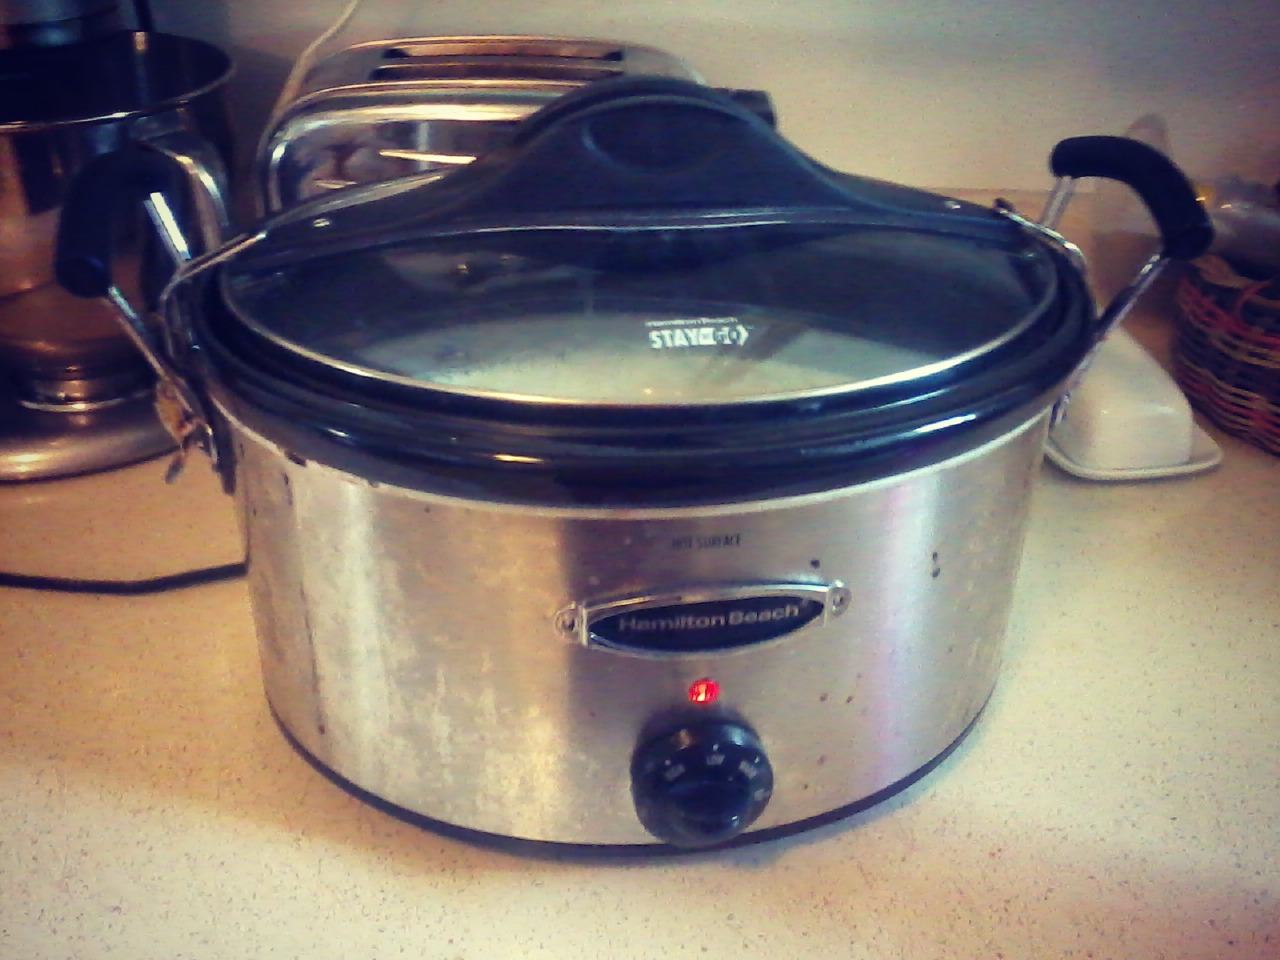
A couple of years ago I tried to make my own yogurt and it turned out ok. It was a lengthy process of stove-top mess and small mason jars to put it in. I did it once or twice but decided it wasn't worth all the hassle. So when I saw Money Saving Mom's post on Homemade Yogurt in the Crockpot I decided to give it a try- and boy am I glad I did!!! Talk about easy-peasy! And cheap! I did everything she did except I used 1% milk and a small 6 oz container of vanilla yogurt.

             Easy Homemade Yogurt:
  • 1/2 gallon milk (Whole milk will make your yogurt thicker, I used 1 %)
  • 6 oz plain /vanilla yogurt (anything with live-active cultures will work)
Pour the half gallon of milk into your crock pot and turn it on low. Cook it for 2 hours and 45 minutes (I set my timer to remember to turn it off!)


After 2 hours and 45 minutes, turn the crock pot off and let it sit for 3 hours- do not do anything to it.


After 3 hours- spoon a small amount of the milk into a small bowl and add the yogurt to it. Mix together thoroughly. (sorry no pictures of this step!)

Dump this mixture back into the milk in the crock pot and mix it around well.

Put the lid back on your crock pot and wrap the crock pot with a large beach towel or blanket (make sure the crock pot is unplugged and turned off!).


I used one towel to wrap all the way around kinda tight, then placed another one over the whole thing, including the lid.

Let the beach-towel-wrapped crock pot sit for 8-12 hours (or overnight). After 8-12 hours, it should be thickened.


Spoon yogurt into jars or plastic containers and refrigerate a few hours before eating.

This will keep for about one to two weeks in the refrigerator. 

Save a half cup to use as a starter for your next batch of homemade yogurt.

When we go to eat it, the kids cannot eat it plain. I put a small scoop of homemade strawberry jam in the bottom of their bowl then add some yogurt and stir it up. They LOVE it this way!!!


As for me I LOVE the drinkable yogurts which I cannot find many places anymore, so I throw a cup of this yogurt into the blender with a banana and a couple handful's of blueberries and voila a drinkable yogurt!

Yes, we use mason jars as our drinking glasses!!

This was so easy and I will for sure be making this on a weekly basis because that's about how fast we will go through this stuff.

KID APPROVED!!!


I am using big mason jars and some Ziploc re-usable plastic containers to store them in the fridge. 

Here is a cost breakdown on how much money can be saved by making your own:

I was buying the store brand yogurts for the kids to eat at $.40/each. For one snack they would each have 1 so that would be $1.20 per snack for all 3 of them. I made my first batch using a store bought yogurt (wont have to buy more for next time though), and a half gallon of milk. I get milk for $2/gallon. This one batch cost me $1.40. It makes 3 snacks and 2 yogurt drinks for me. The cost of those things retail would be $5.60, so I saved $4.20 by making my own. Next time I make it I wont have to buy the yogurt so it will be $1 a batch. Can't get any better then that!!!! Well maybe if I had my own goat and could use the milk from said goat...

...but well we can't go there...YET! 

Monday, June 18, 2012

Meal Planning Made Easy...


I often have other mom's asking me how I meal plan since I do so a month at a time. I do this because my husband only gets paid once a month. I like having all our meals for the month planned out and most of the shopping done to ensure that during the last week before the next payday we are not eating beans and rice! My budget for our family of 5 per month on groceries (includes tp and stuff like that) is $360 a month. That is $70 per person for 28 or so days- 3 meals a day plus snacks. Its tricky- but can be done!!

First choose what meal you want to plan first- I will start with dinner because it is the trickiest.

Next you want to go through all of your families favorite recipes...pick out 8 for the month. I swear you will be eating more then 8 dinners!!

You will eat 4 one week, then 4 more the next week...the 3rd and 4th weeks you will simply repeat the first 2 weeks dinners over again. This way you just buy double when grocery shopping and you don't have to reinvent the wheel 16 times!! And if some of your dinners are casseroles or something that can be made 2 at once, you can make one and stick one in the freezer to eat in 2 weeks!

Our family has a Friday night "pizza night" every week- and a Saturday night "breakfast for dinner" night- so that is 8 more dinners. Sunday night is leftover/sandwich night- so there are 4 more...so there you have it 28 or so meals all planned out!

Here is my example for this months dinner menu:

June 18-24

Monday- Homemade Mac and Cheese, veggies & bread
Tuesday- Enchiladas, beans, rice
Wednesday- BBQ chicken in the crockpot, bread, veggies
Thursday- Sausage in a Garden w/rice
Friday- Pizza & fruit
Saturday- Cheese Omelets, sausage & toast
Sunday- leftovers

June 25-July 1

Monday- Cheesy Pasta, veggies, bread
Tuesday- Tacos, beans, rice
Wednesday- Chicken & rice in the crockpot plus veggies
Thursday- Meatloaf, veggies, bread
Friday- Pizza & fruit
Saturday- French Toast, bacon, fruit
Sunday- grilled cheese & fruit 

July 2-8 (this part wont be our true menu because we will be camping for some of it- but if we were home this is how we would do it!!)

Monday- Homemade Mac and Cheese, veggies & bread
Tuesday- Enchiladas, beans, rice
Wednesday- BBQ chicken in the crockpot
Thursday- Sausage in a Garden w/rice
Friday- Pizza & fruit
Saturday- Cheese Omelets, sausage & toast
Sunday- leftovers

July 9-15 

Monday- Cheesy Pasta, veggies, bread
Tuesday- Tacos, beans, rice
Wednesday- Chicken & rice in the crockpot plus veggies
Thursday- Meatloaf, veggies, bread
Friday- Pizza & fruit
Saturday- French Toast, bacon, fruit
Sunday - grilled cheese & fruit 

And this brings us back to the next payday-where we will do it all over again!  Very easy peasy way to do a dinner menu for the month.

Next you will write down the ingredients from your recipes so you will know what you need for those meals. Then you will want to go through your fridge and cupboards and take inventory of what you have and what you will need.

Now for lunches I do 7 different lunches and repeat each week...same for breakfast which I explained a little better here.

An example of a week of lunches:

Monday: Soy butter & jelly sandwiches, chips, fruit
Tuesday: Leftover mac and cheese (from last nights dinner) & fruit
Wednesday: Hot dogs with fruit
Thursday: Cup of Noodles with fruit
Friday: Turkey & Cheese sandwiches, chips, fruit
Saturday: Whatever you can find
Sunday: Hot dogs and pickles

Here are some of our favorite snack ideas:

Granola Bars, yogurt, fruit bars, rice krispie treats, homemade cookies,or these homemade cookies,  fruit, string cheese

I also created this menu to keep on the wall so the kids always know what we are having for each meal- it has been  SOOO helpful because I was dealing with 3 children constantly saying whats for dinner?? whats for lunch? whats for dinner in 3 days?? (yes they asked me that!) I have a laminator so I laminated the menu and just erase and re-write each week to keep it updated!


Tuesday, June 5, 2012

Homemade Tortillas

I made my wonderful homemade tortillas tonight for our enchilada dinner. Once you make them homemade, the store bought will be completely unacceptable! Especially to your spouse! I love this recipe because it is quick and easy- you could get a tortilla press to make them a bit quicker, but I am pretty speedy with my rolling pin so that has not been necessary. Make sure you have a cast iron skillet to make these- I have never tried it on a regular skillet- but cast iron works great! You will want it heated to medium.  Here are directions on how I make them- give it a try- you wont regret it!!!!

Ingredients:

3 cups flour (sometimes I use 2 cups whole wheat, 1 cup white)
2 tsp baking powder
1 tsp salt
5 TBSP shortening or lard
1 1/4 cup water


 Mix the flour, baking powder, salt together- then add shortening and cut in.


I use my hand to make sure all the shortening is getting mixed in really good with the dry ingredients. Make sure it feels cornmealish- I also think it resembles the feel of moon sand...all mommy's with young kiddos will know what this feels like. Then add the water slowly while working it into a dough ball. (you may not use all the water & may have to add more flour if it is too sticky.) Once you have kneaded it into a nice round non-sticky ball leave it in the bowl and cover it for 10 minutes or so to let it settle.


After that break it into small pieces and work it into a ball by using your thumb and pressing in inwards- hard to explain but just make a bunch of dough balls. Cover this again and let it sit for 10 more minutes.


Turn your burner on to warm up your skillet- no higher then medium.

Next have your counter or cutting board floured a little and take one dough ball and smoosh it down then use the rolling pin to roll it out in a circle. I flip it over and around to get it in a nice circle. 


Go ahead and put it on your hot skillet and it should make some bubbles..if they are really big I usually pop them with the corner of my spatula. Then turn it over and leave it for about 30 seconds. Take it off after this it should be done. You don't want to leave it too long or it will burn and not be nice and soft.


While its cooking on the first side I try to get a couple more rolled out and ready so I always have another one ready for the skillet.


You should get 18-20  6 in tortillas out of one batch.


I was able to make a pan full of enchiladas and have 5 tortillas left over- we will eat these as a snack tomorrow with butter and honey on them. This is a BIG treat in our house and loved by everyone!

**I have also made a batch and cooked half into tortillas and put the rest of the dough balls in a freezer ziploc in the freezer. I let them sit on the counter to defrost when I need them and this gives them a chance to settle and be ready to be rolled out. You may need a little extra flour on the cutting board because of a bit of moisture **


Monday, May 28, 2012

Homemade Bagels!

My friend Kelly gave me her homemade bagel recipe and I finally decided to try it out! It ROCKS! My whole family loves them- they are a bit of work but totally worth it!

I decided last time I was at Sam's that I wanted to start making most of our bread products from scratch because you can buy HUGE bags of flour for next to nothing, as long as you have somewhere to store it and use it in a relatively fast amount of time. (Like 6 months) I have been baking a TON lately since I bought 25 lbs of bread flour and 25 lbs of regular flour. I also bought 2lbs of yeast!! It was only $4...one of those packets with 3 uses is $2...so I figured even if I don't use it all, I will use enough and not have to buy any for a LONG time!!


Here is the Bagel recipe- Kelly has given me permission to share it- she made it up herself because she is just awesome!


Plain Bagels (makes about 13-14 bagels):
1. 1 1/2 cups warm water
2. 3 tbs sugar
3. 1 tsp salt
4. 3 1/4 cups bread flour
5. 3 tbs wheat gluten  (I found this at Sunflower Market- it is Bob's Red Mill brand)
6. 1 cup all purpose flour
7. 3 tsp yeast

 
In bread machine, combine ingredients as listed and run through the dough cycle.


    Turn out onto a lightly floured surface and cut into 13-14 portions, shape into smooth balls. 


Poke a hole in the center with your finger, and gently enlarge the hole while working the bagel into a uniform shape.

Put on a lightly floured or cornmeal-covered surface. Cover, let rise 30-45 minutes.


Meanwhile, start a gallon of water boiling. Add 1 tbs molasses or oil, mix it around a bit after water boils before putting bagels in. Reduce to simmering.


Put 3 or 4 bagels into the water, and cook 7 minutes, turning once. Drain them. 


Place on a greased baking sheet, and bake at 350 degrees F for 30 to 35 minutes. Remove from oven.


And there you have it!!! ENJOY!!! (and now I have to go make more cause the kids are requesting them!!!)